Adding Facebook Pixel To Your Website
Introduction
Facebook Pixel is a JavaScript code that allows you to track visitor activity on your website. Whenever a site visitor takes an action (let's say, add to cart), the event will appear on the Facebook Analytics dashboard, and you can then retarget the user with ads.
This document shows how to track events such as Page View, Product View, Add to Cart, Initial Checkout, and Purchase.
Integrating GTM with Fynd Platform
Skip to point no. 2 if you already have a GTM account.
Go to the Google Tag Manager website and create your account. You may refer point no. 3-7 of GTM account creation doc for a detailed walkthrough.
Note down your Container ID as shown below. This container ID will be used to integrate GTM with Fynd Platform.
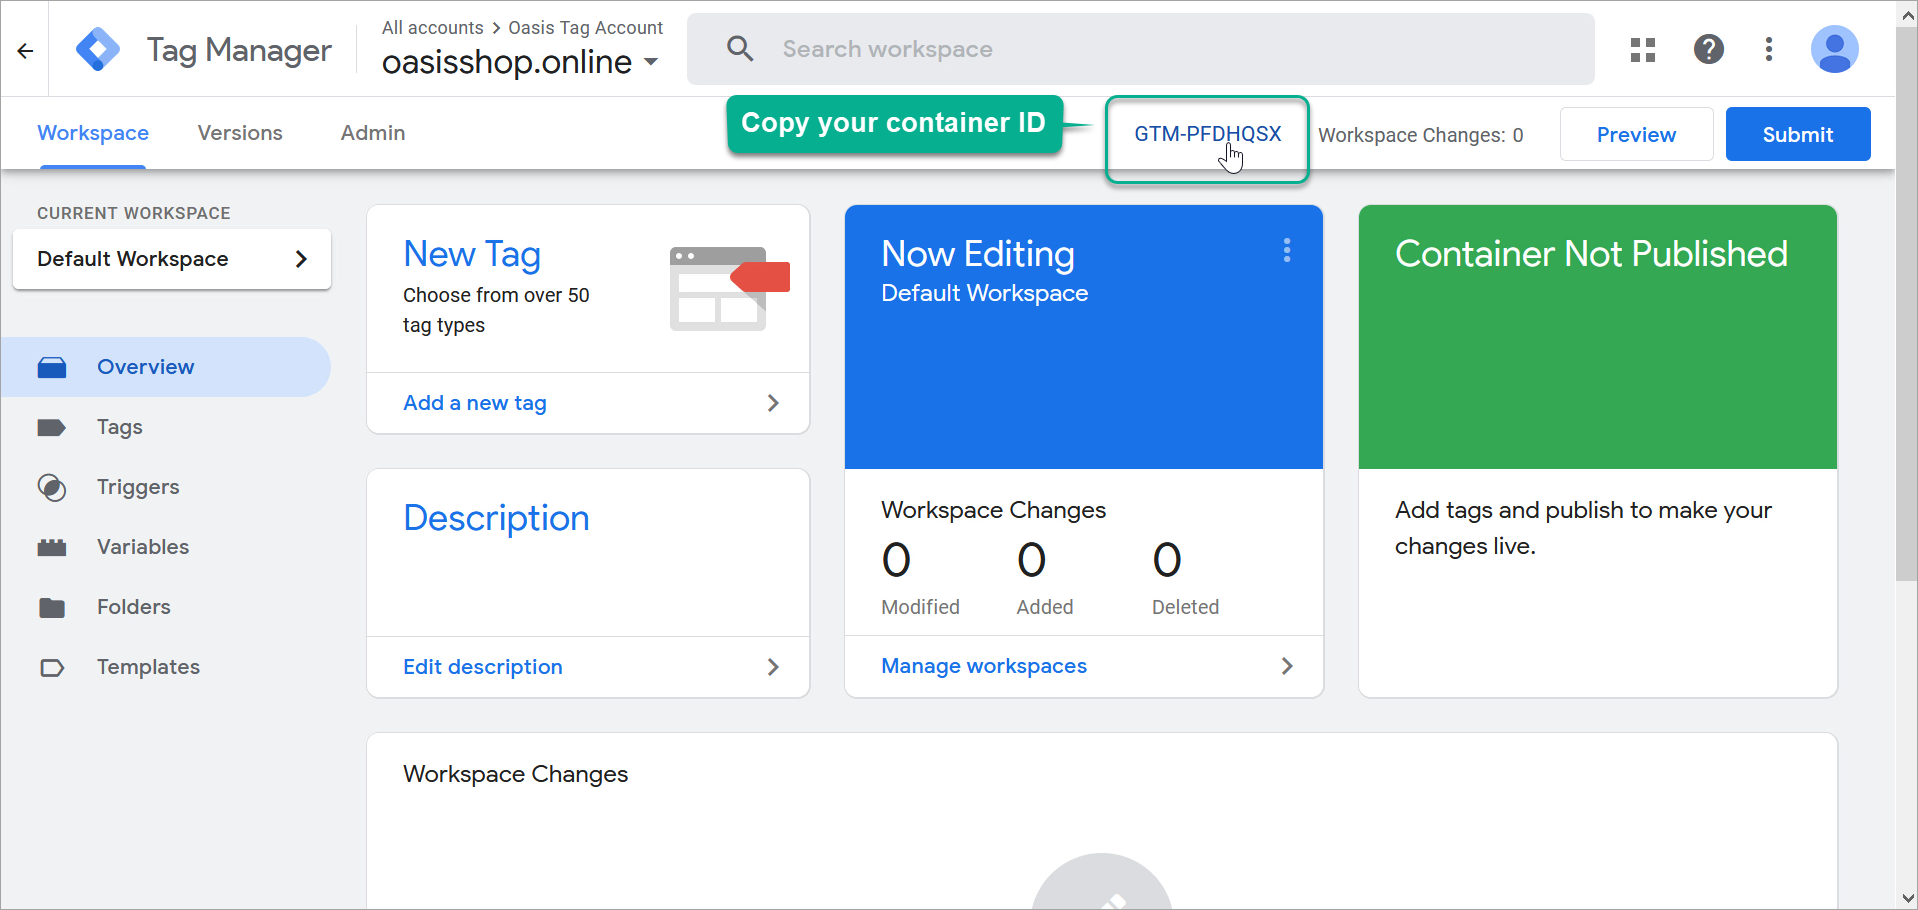
Figure 1: GTM Account
On Fynd Platform, go to the Settings page of your sales channel and click on Integration.
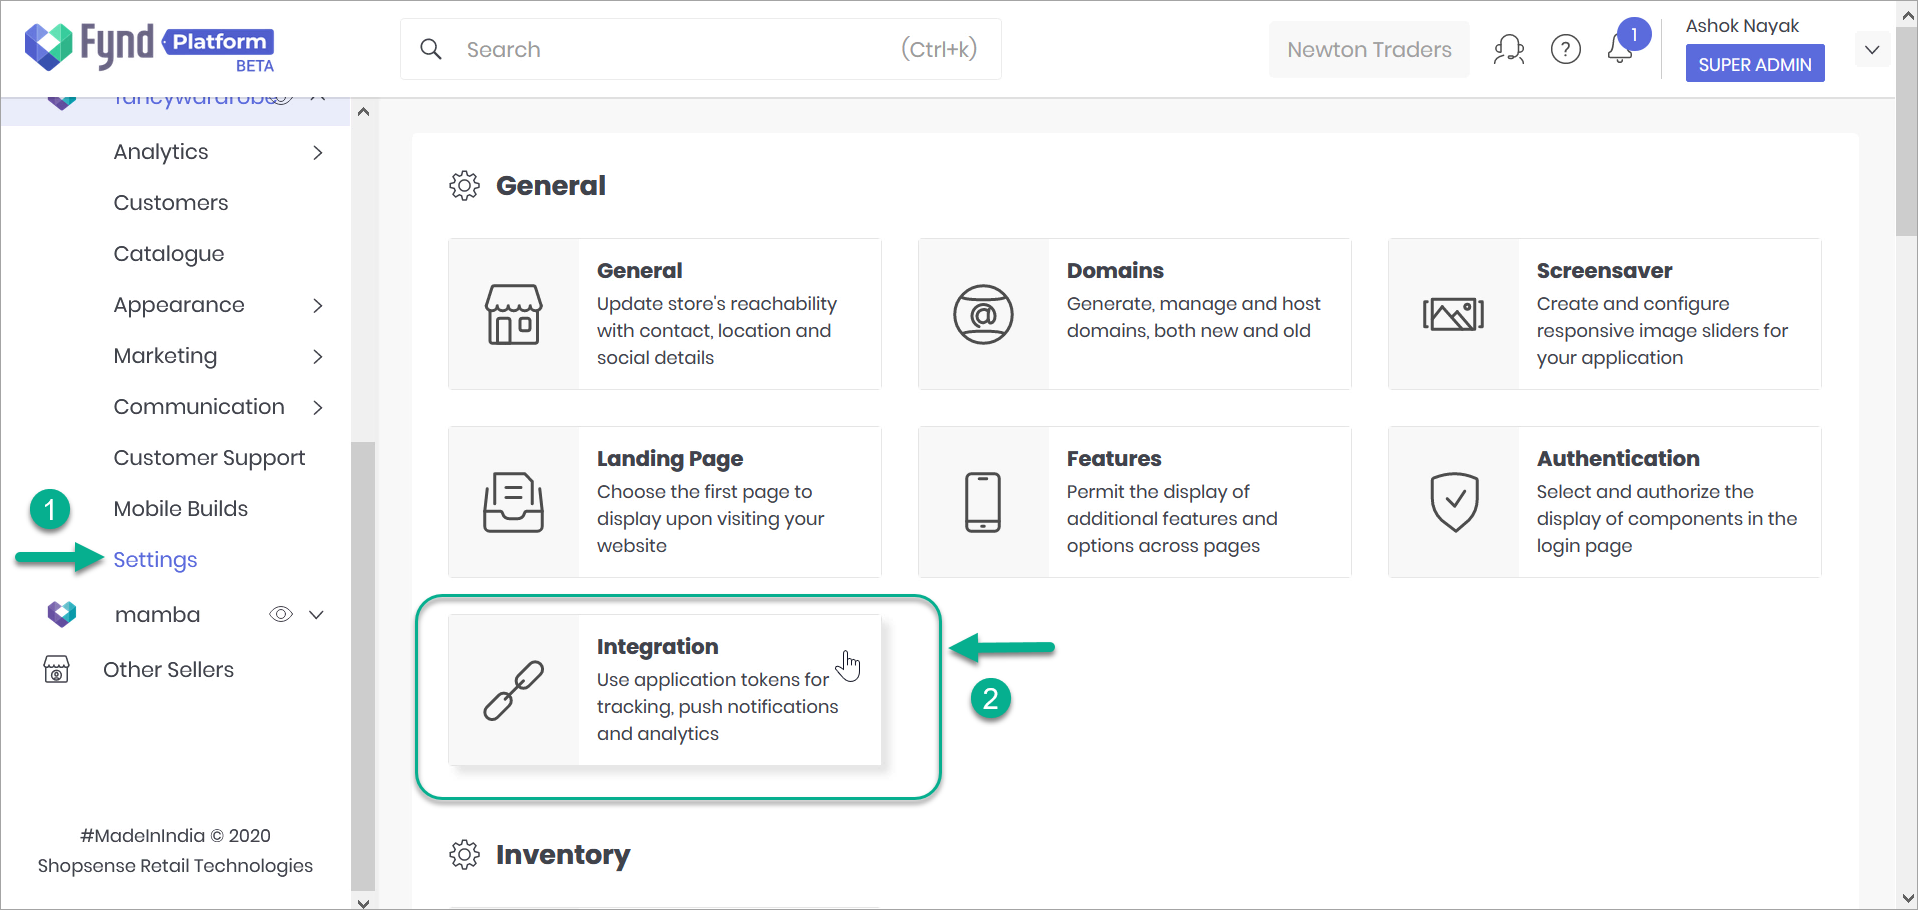
Figure 2: Fynd Platform Integration Settings
Click on GTM.
Paste the container ID in the field named API key. Use the toggle button to enable the integration, and click Save.
Adding Facebook Pixel to GTM
A Facebook Business account. If you don't have an account, click here to create.
Go to your Facebook Business Manager account and click Events Manager on the left.
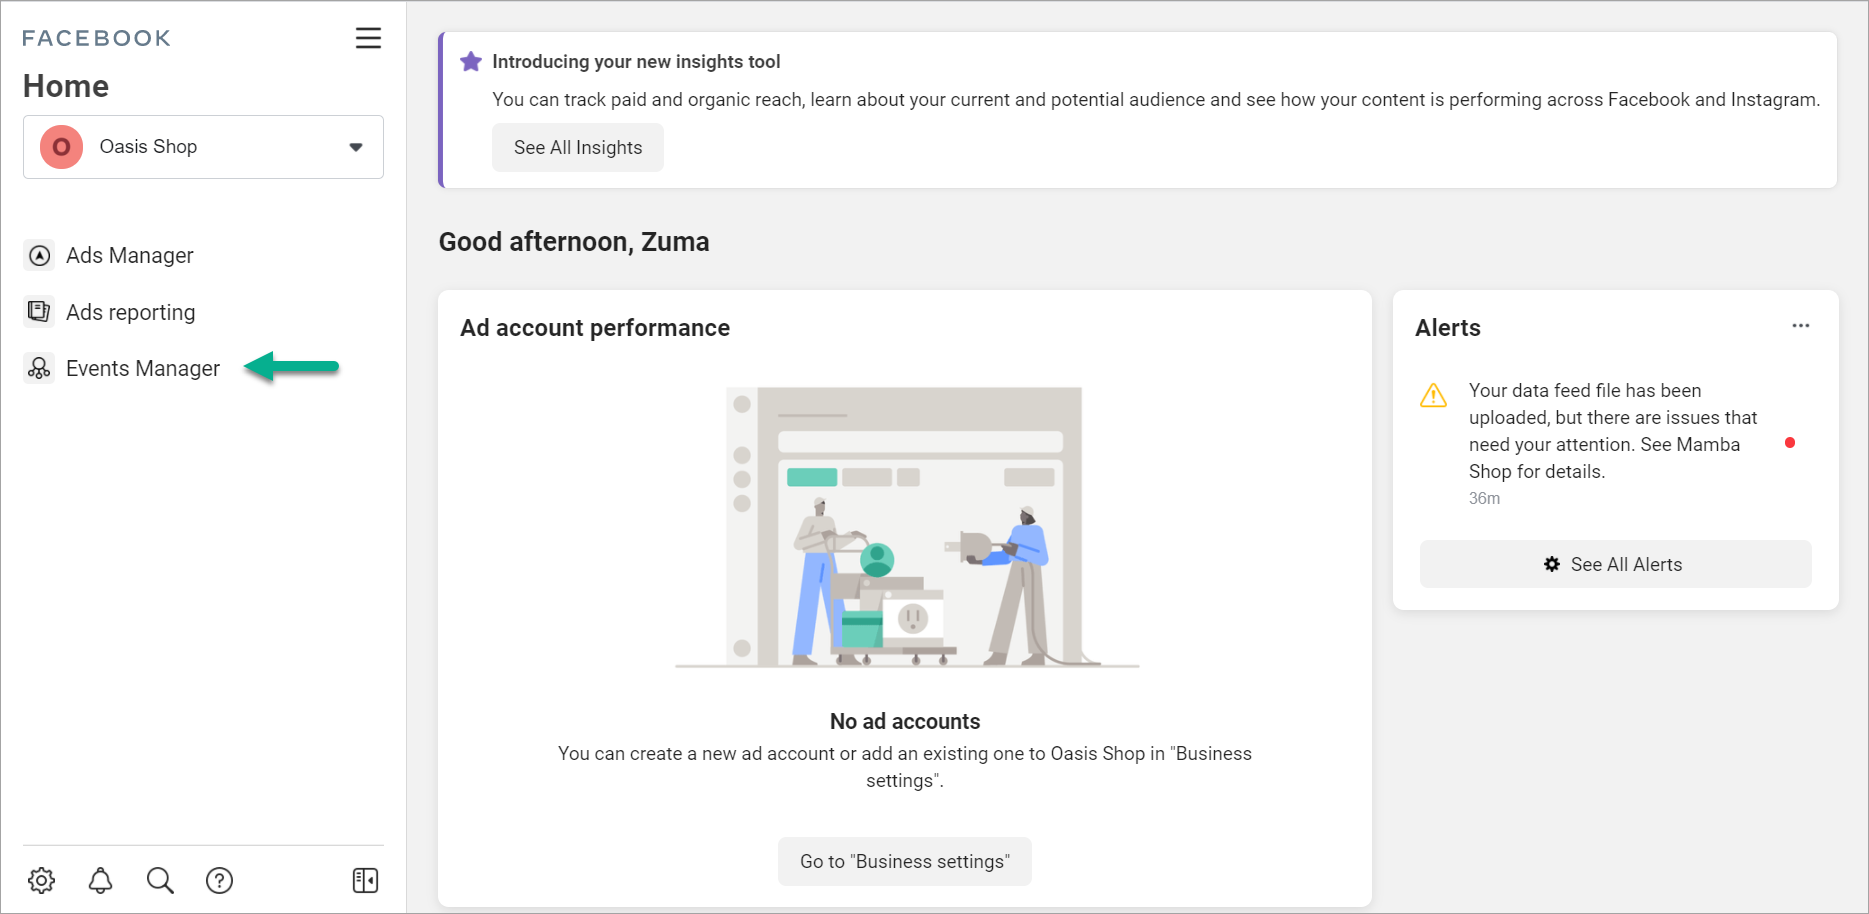
Figure 3: Facebook Events Manager
Click Connect data sources on the left.
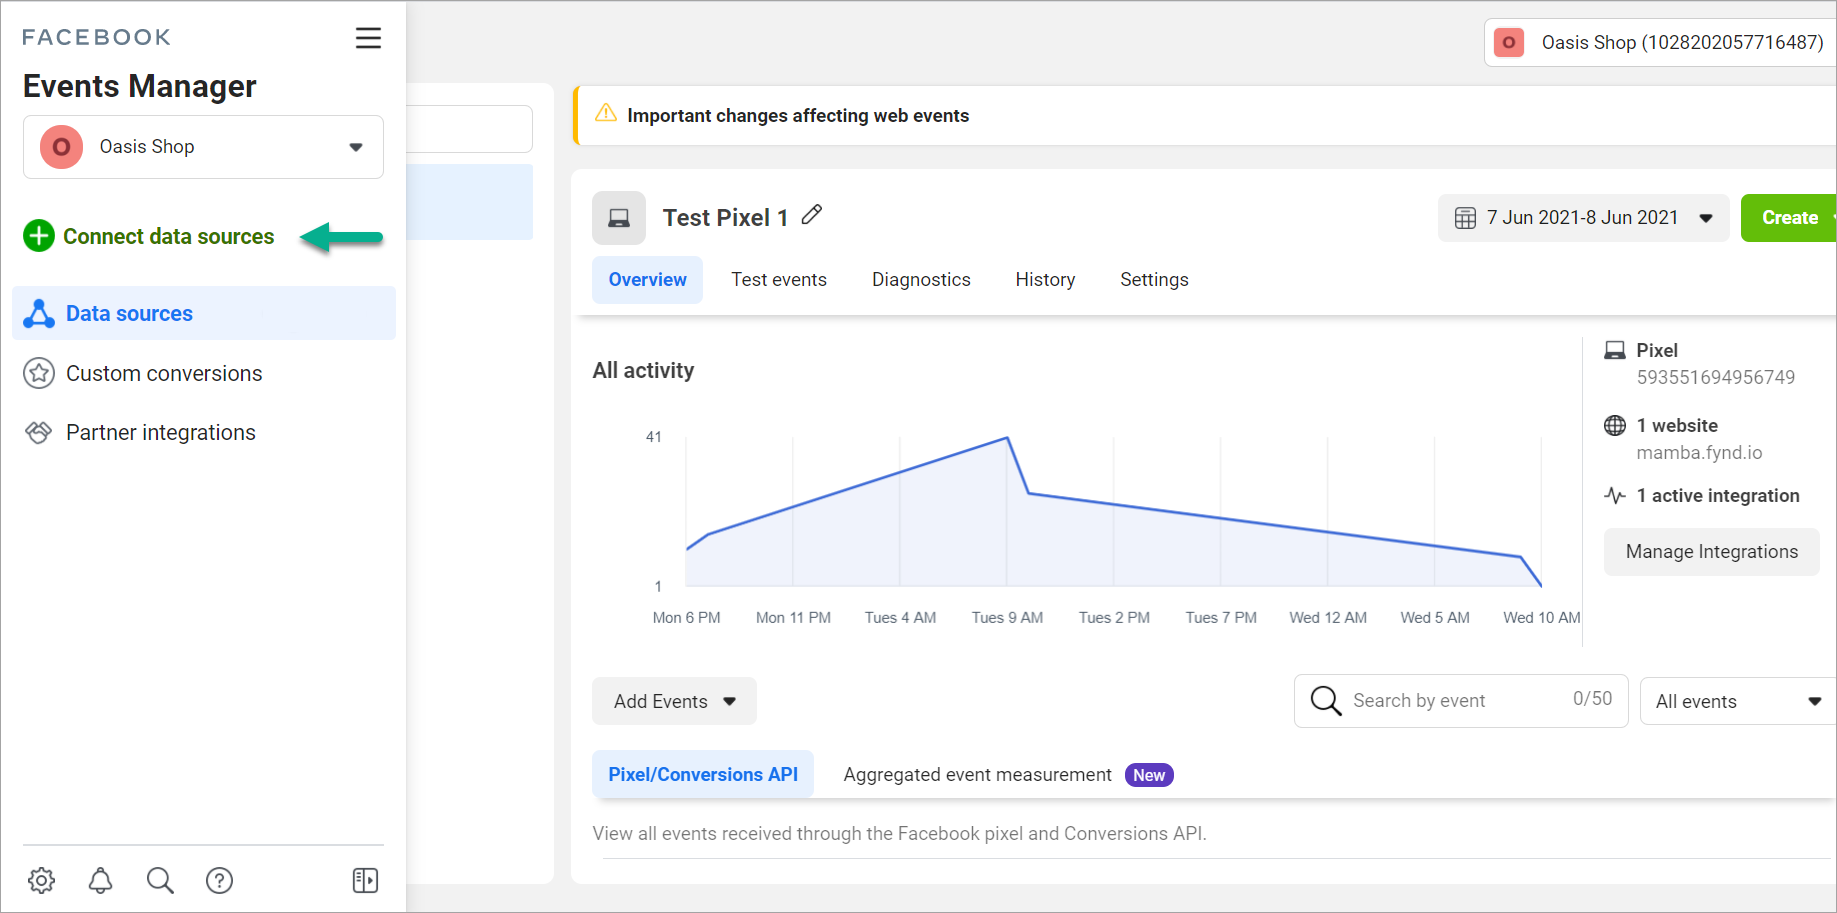
Figure 4: Connecting Data Sources
Select Web in the Connect a new data source popup.
Select Facebook Pixel.
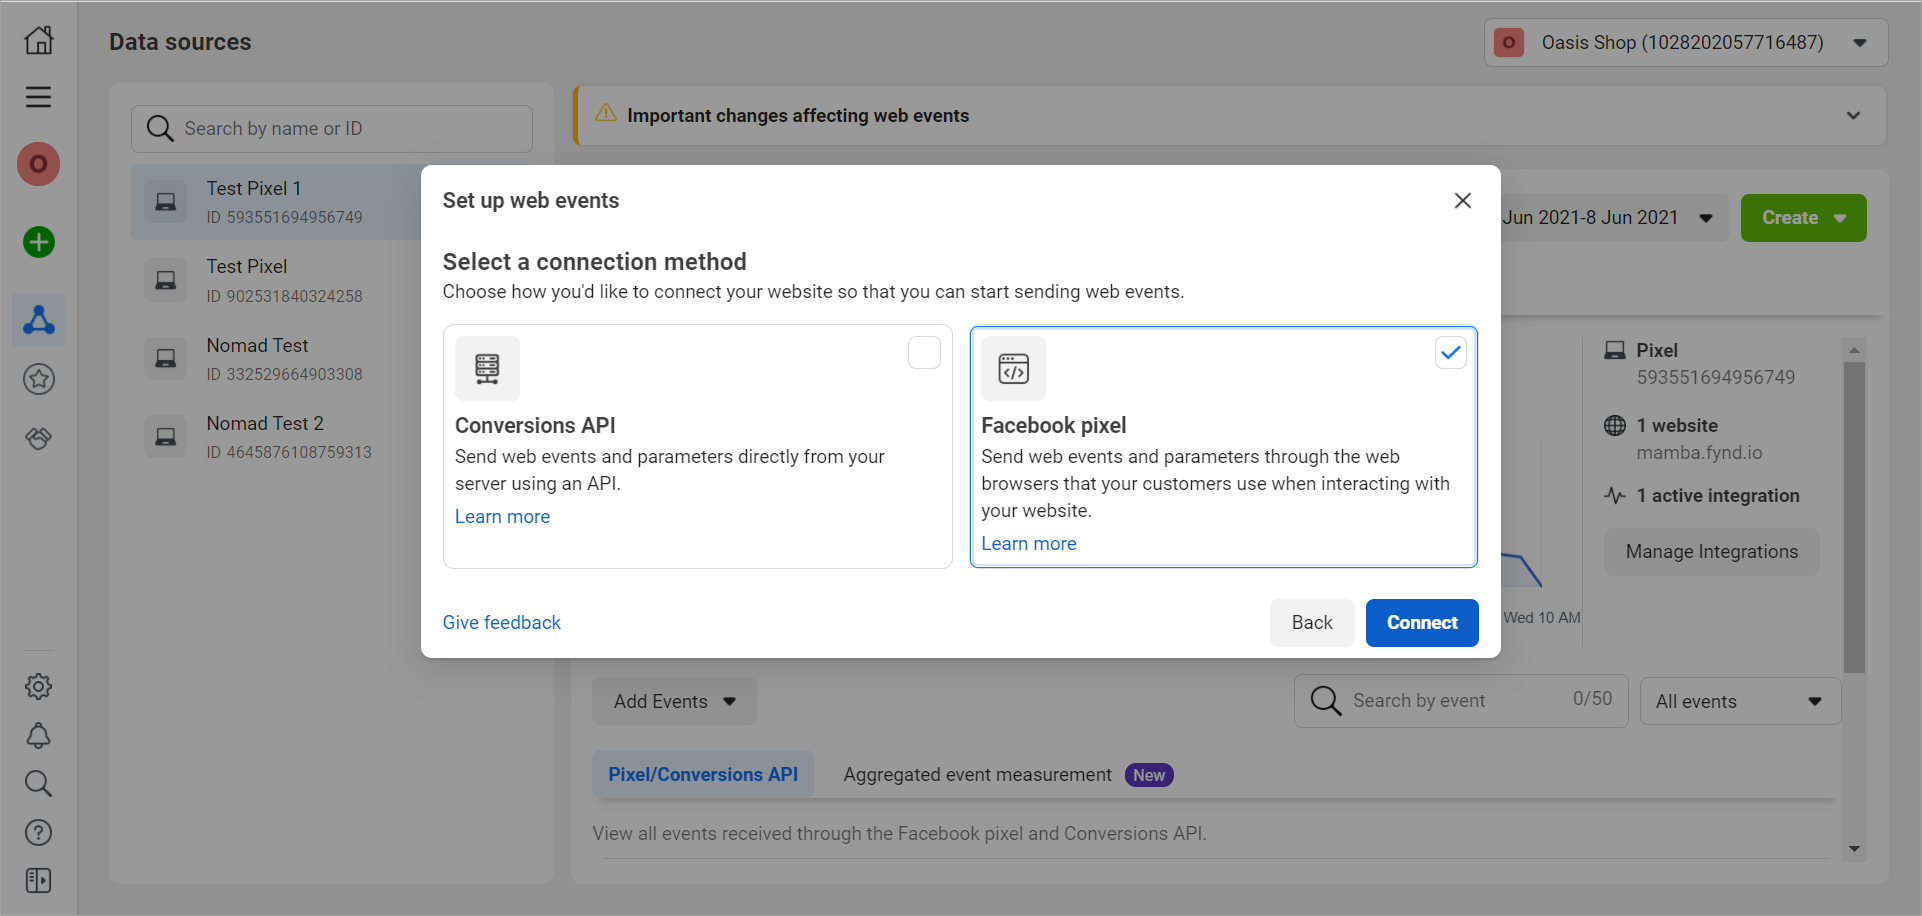
Figure 5: Choosing Pixel Connection
Give a name to the pixel, and enter the URL of your website.
Close the window titled Connect website activity using pixel.
From the Settings page, copy the Pixel ID.
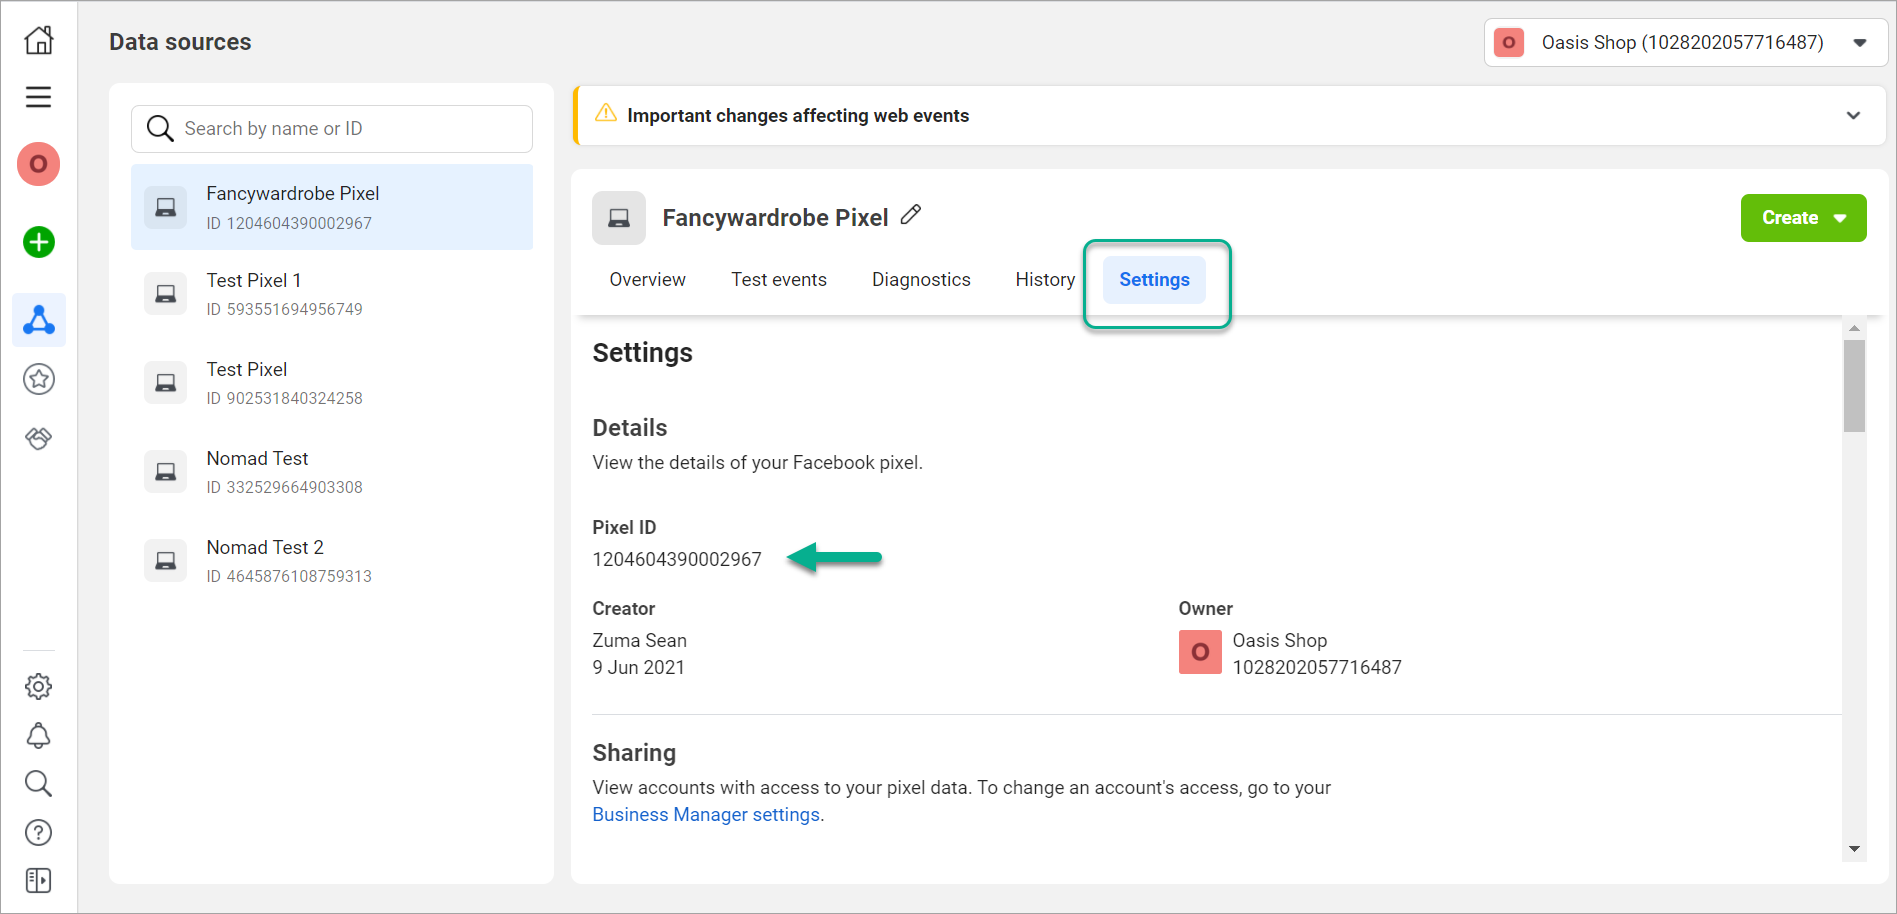
Figure 6: Settings - Pixel ID
Go to your GTM account, and create a new tag.
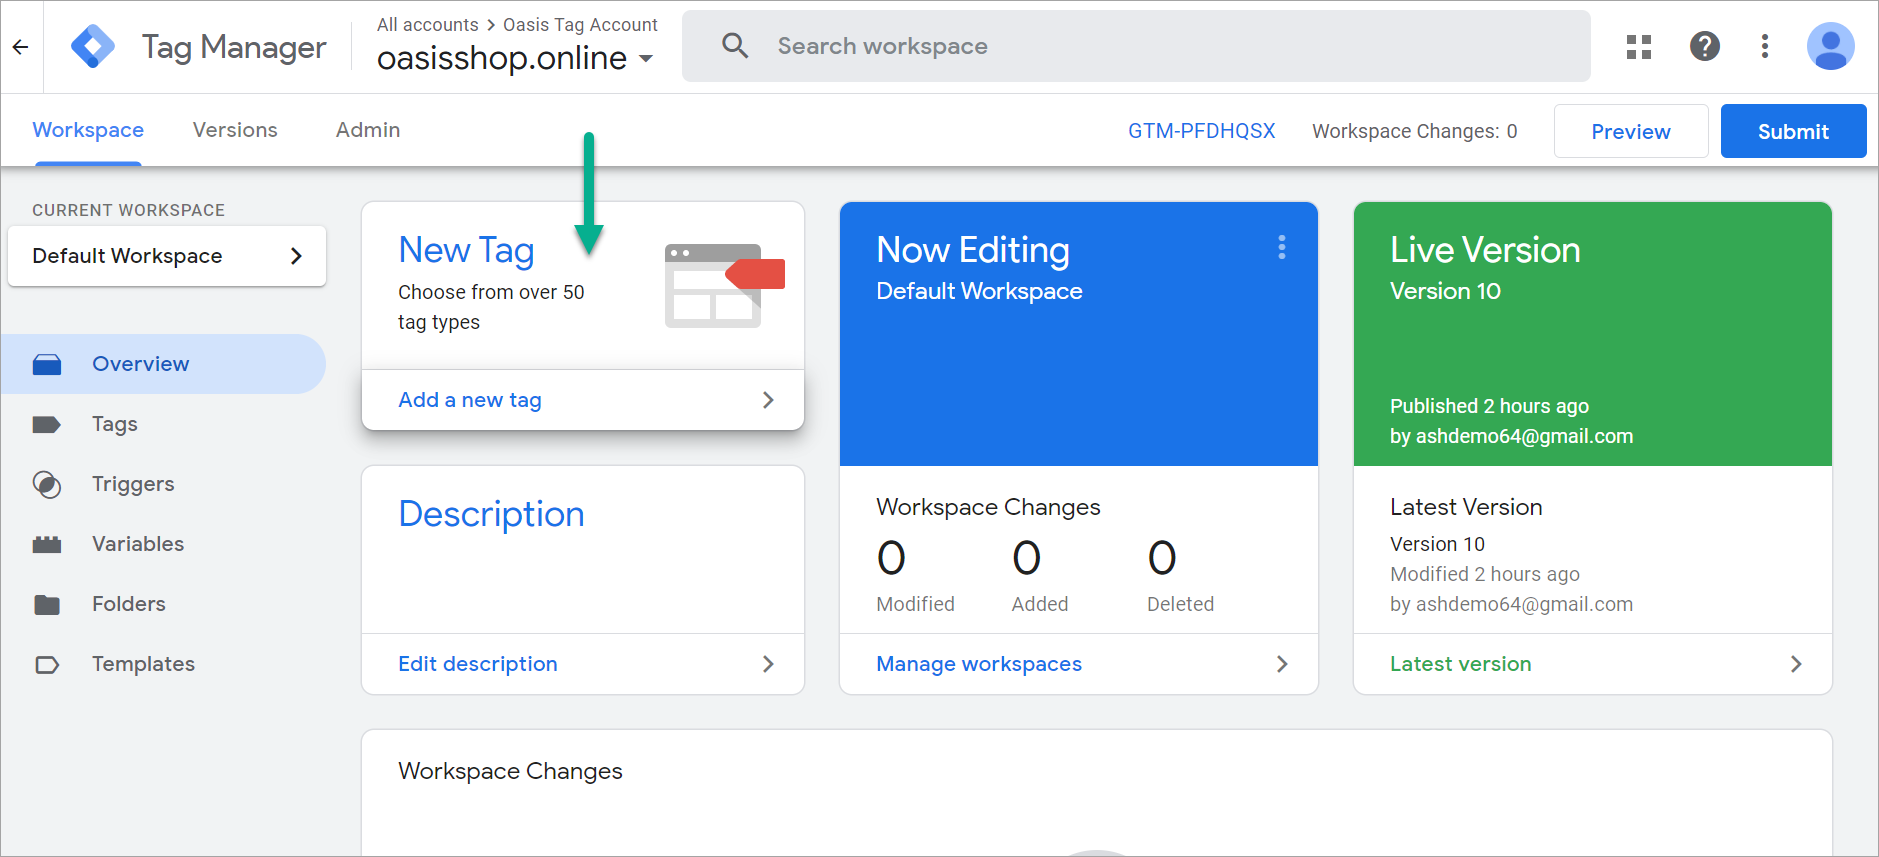
Figure 7: Adding a Tag in GTM Account
Choose the Facebook Pixel template from the Community Template Gallery.
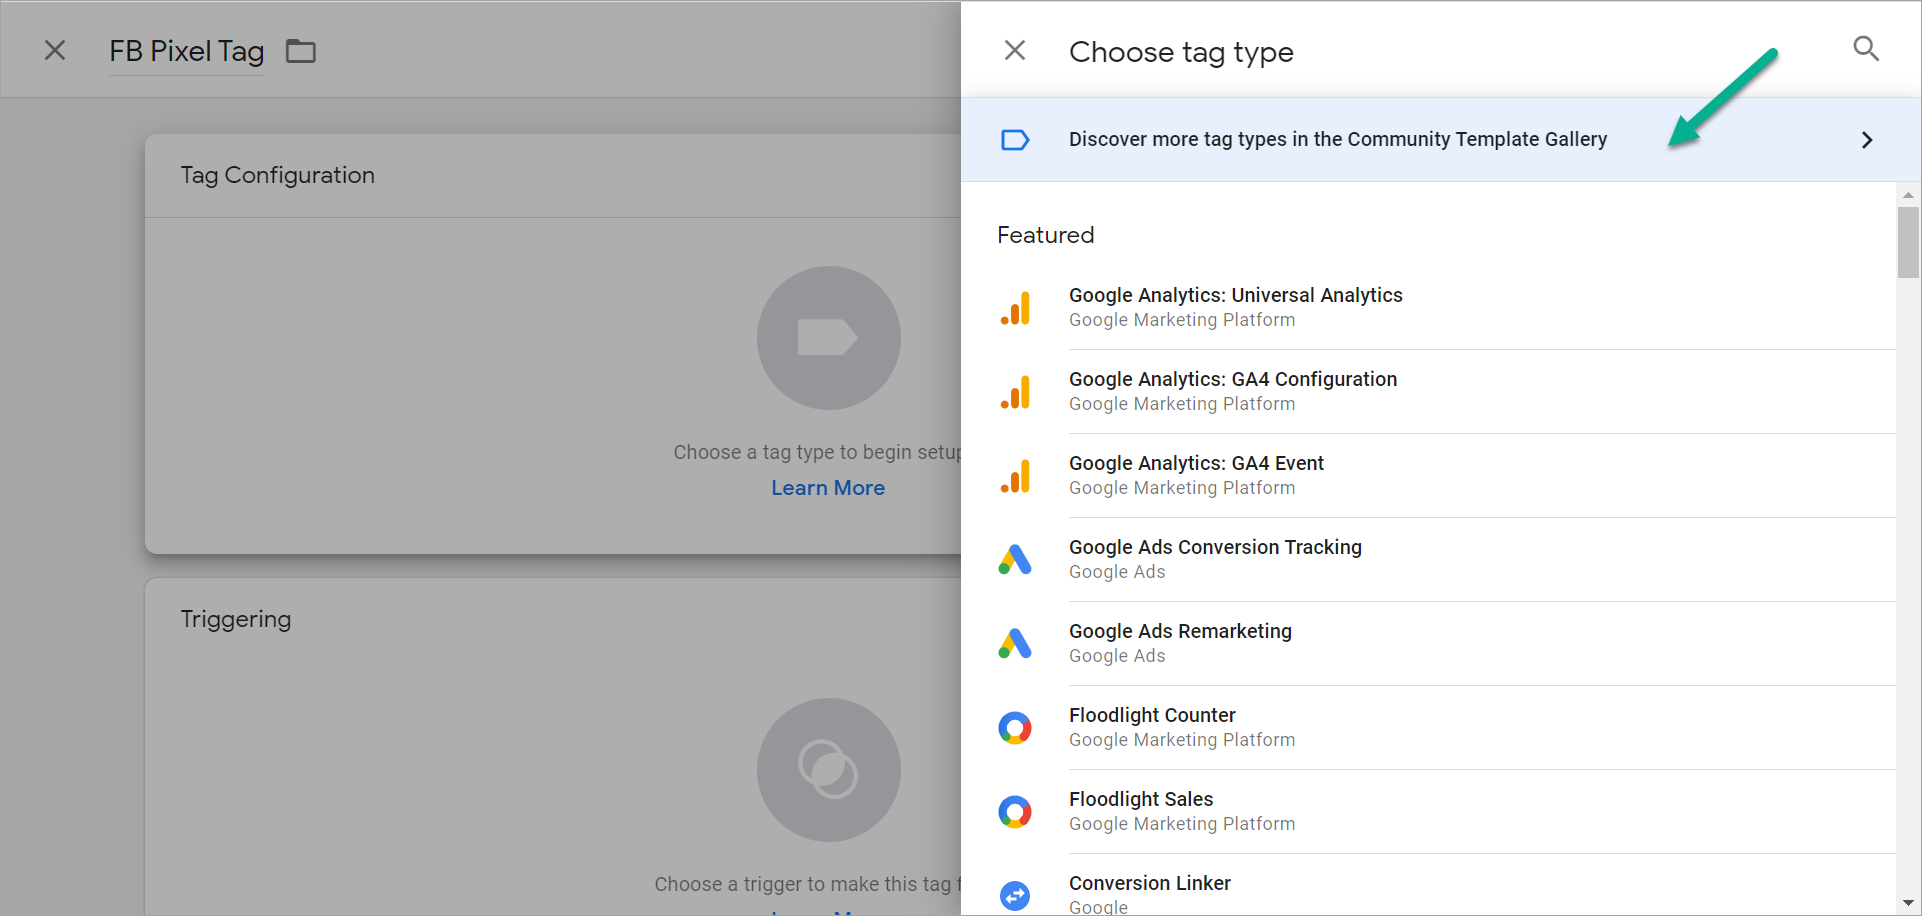
Figure 8a: Community Template Gallery 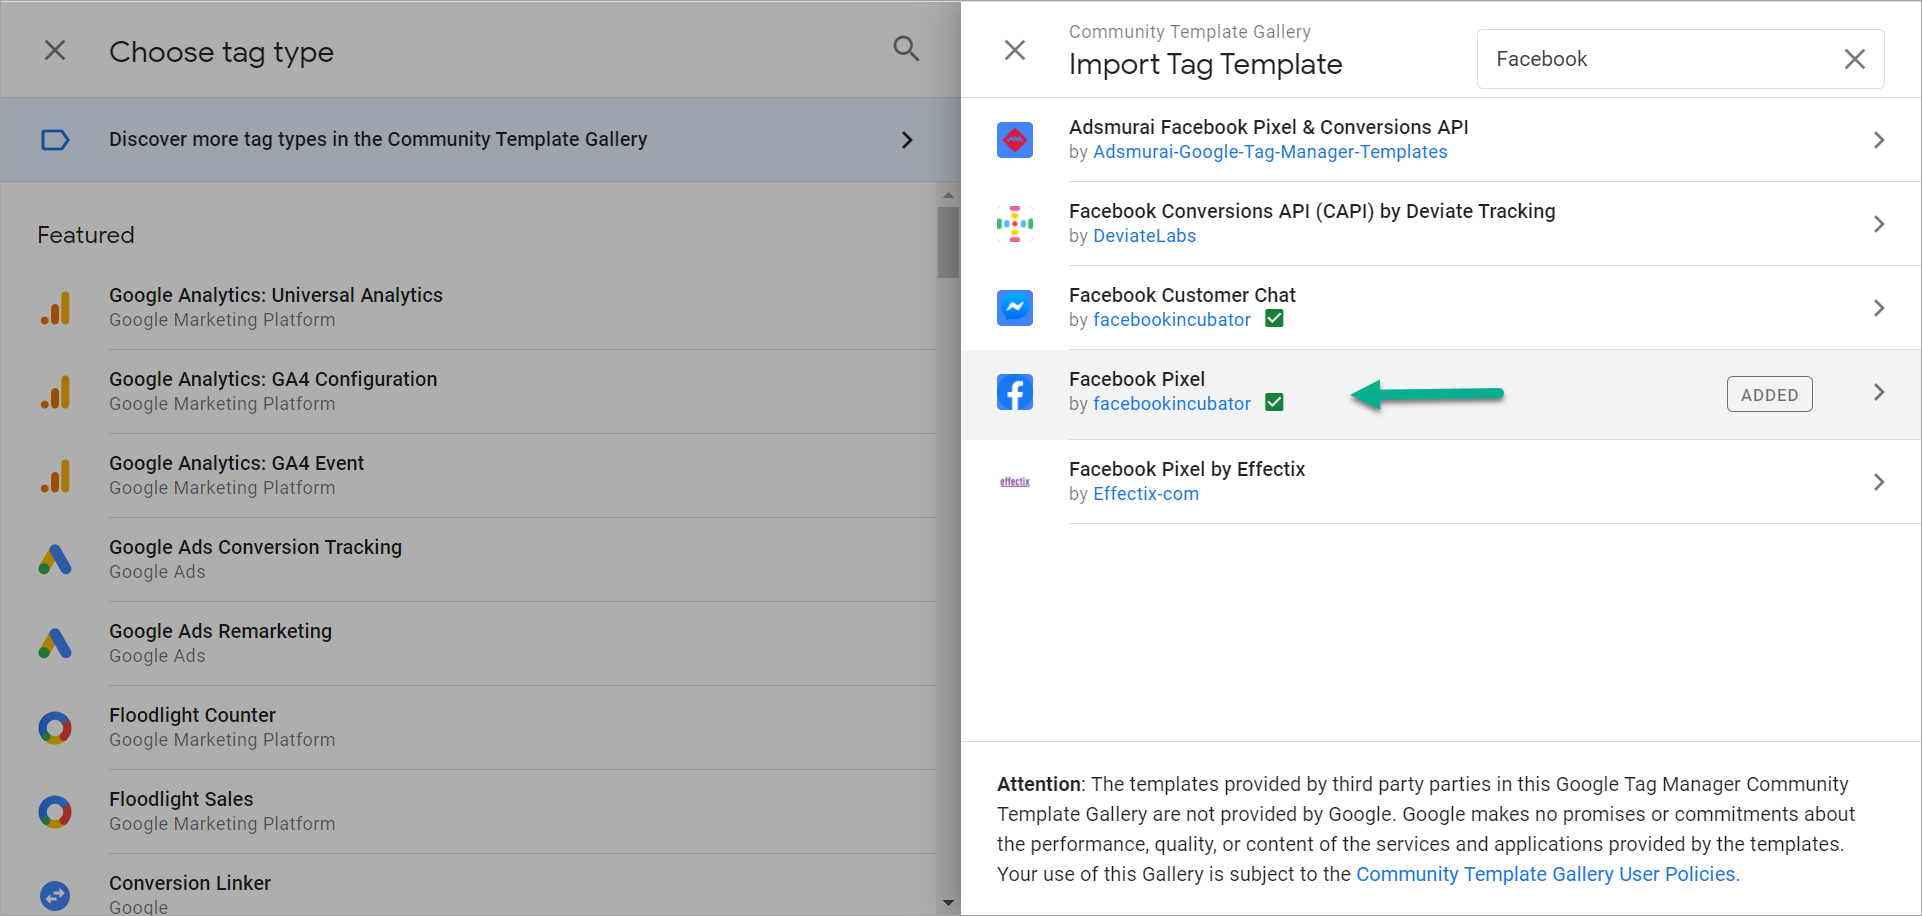
Figure 8b: Choosing Facebook Pixel Template
Paste the Pixel ID from point no. 7, as shown below.
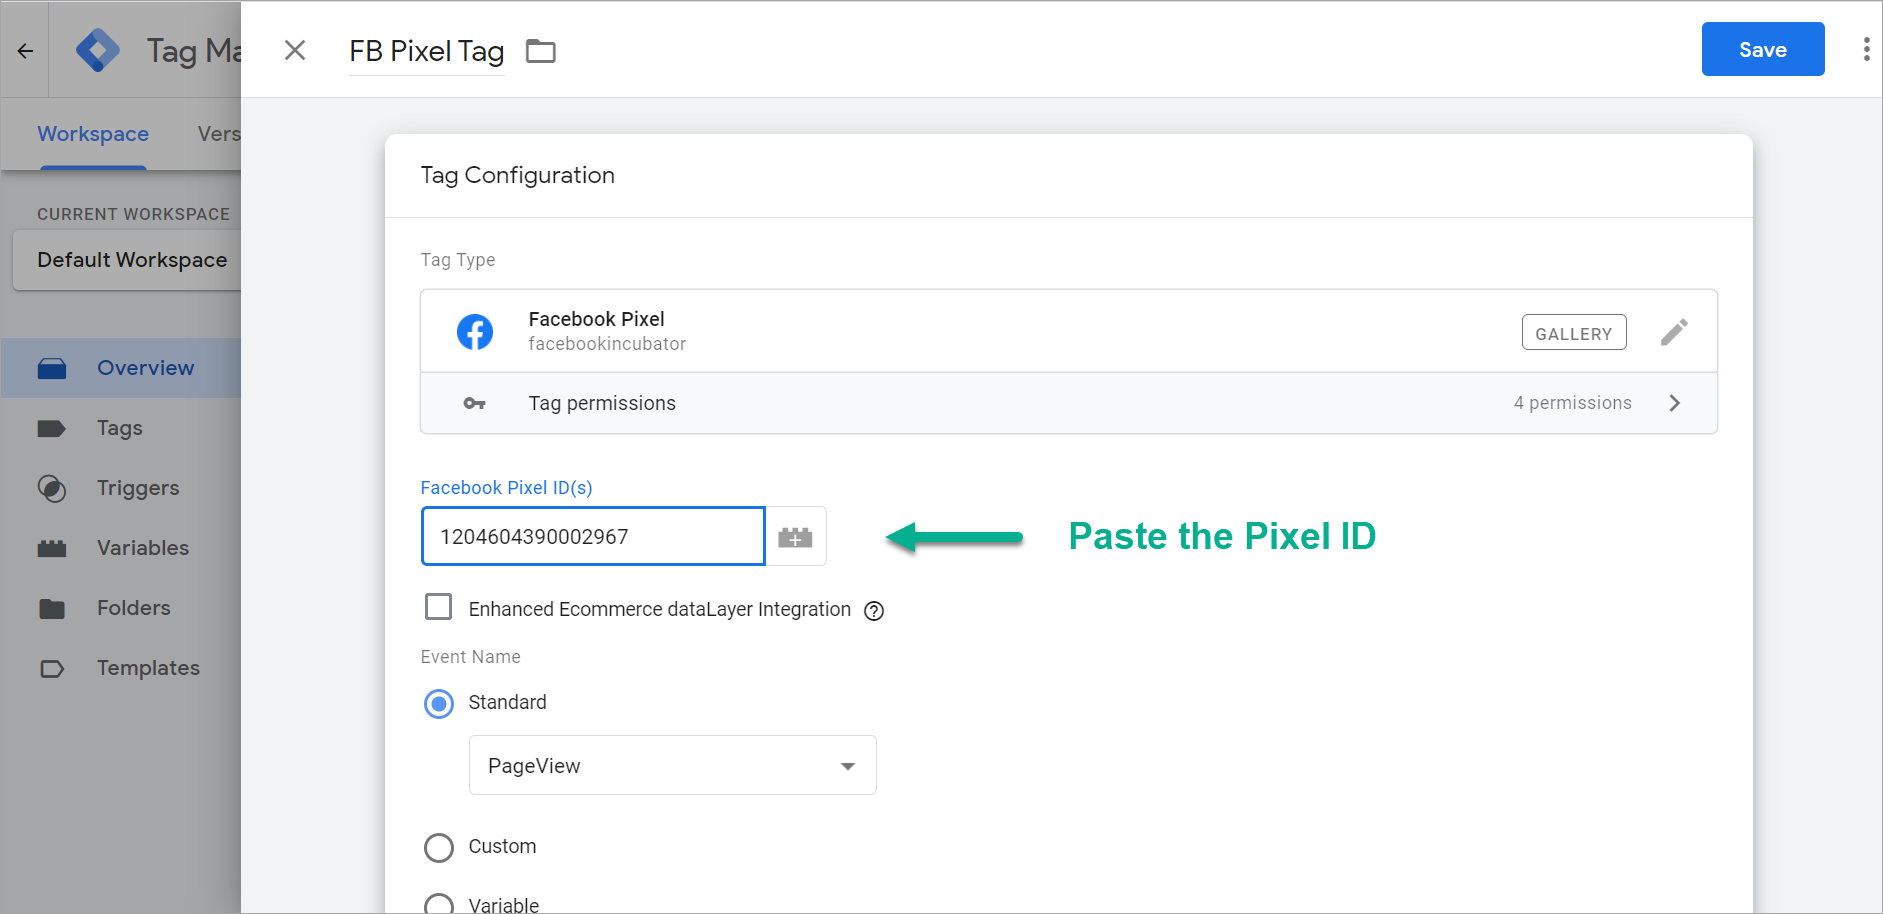
Figure 9: Entering Pixel ID in Tag Configuration
Scroll down to the bottom, and add the All Pages trigger.
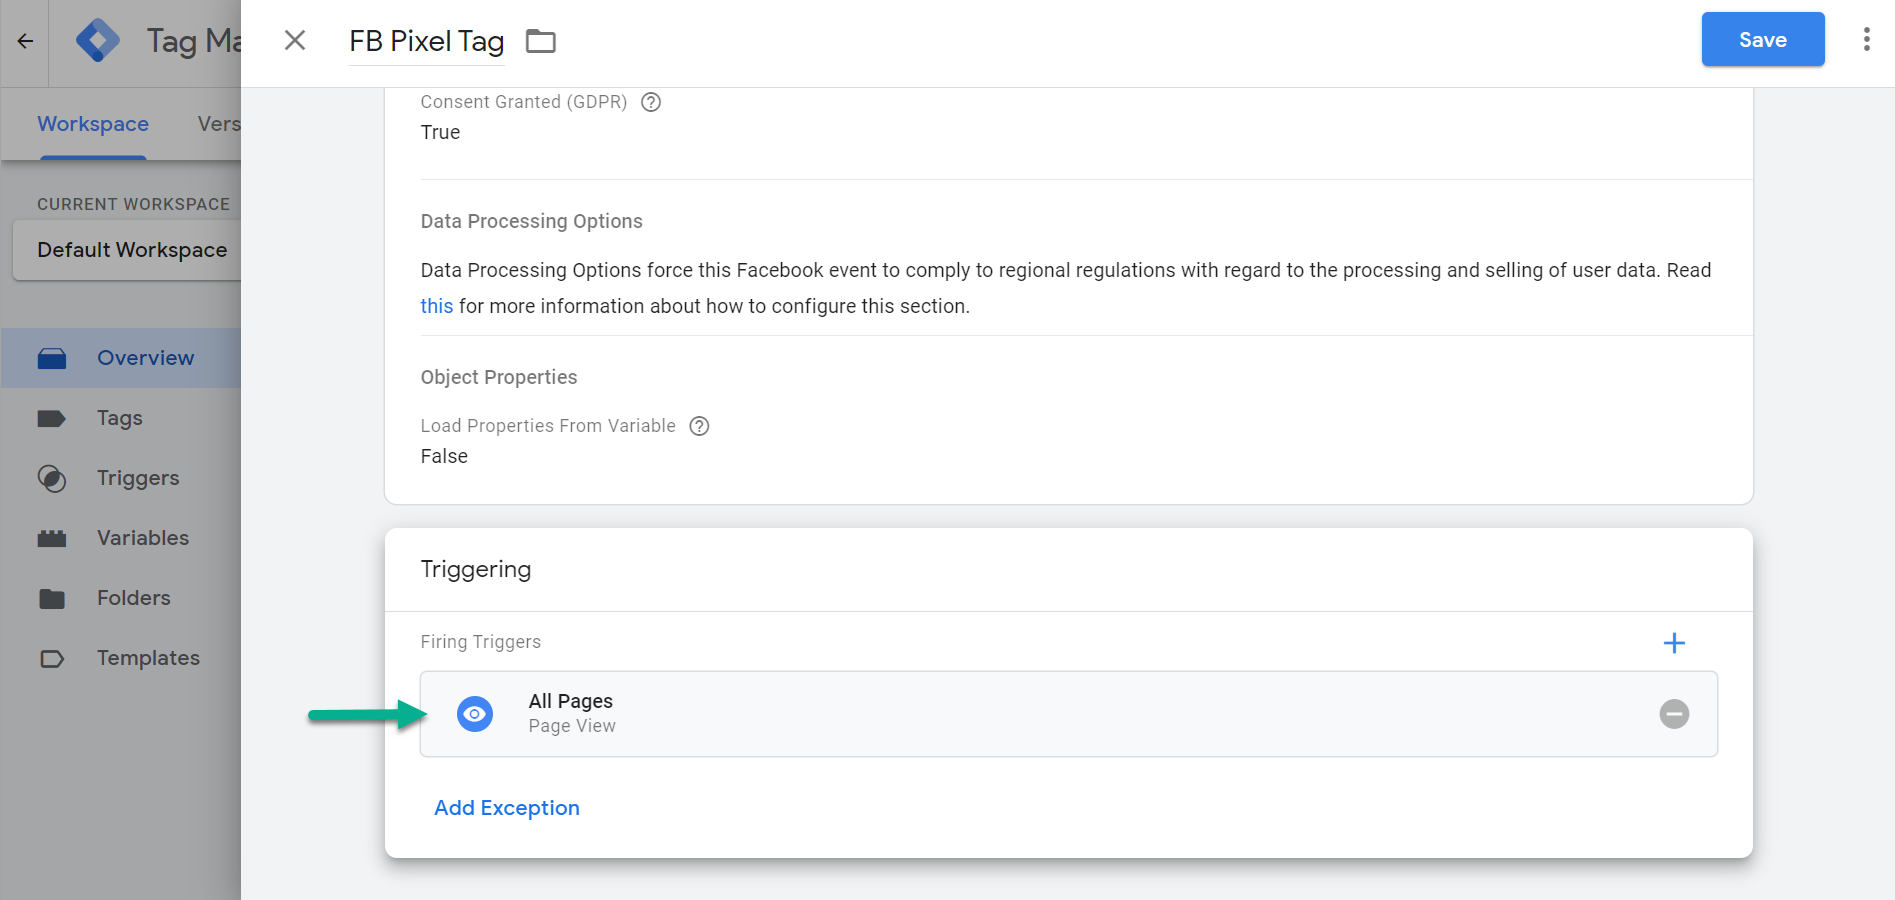
Figure 10: Adding a Trigger
Click Submit on the top-right.
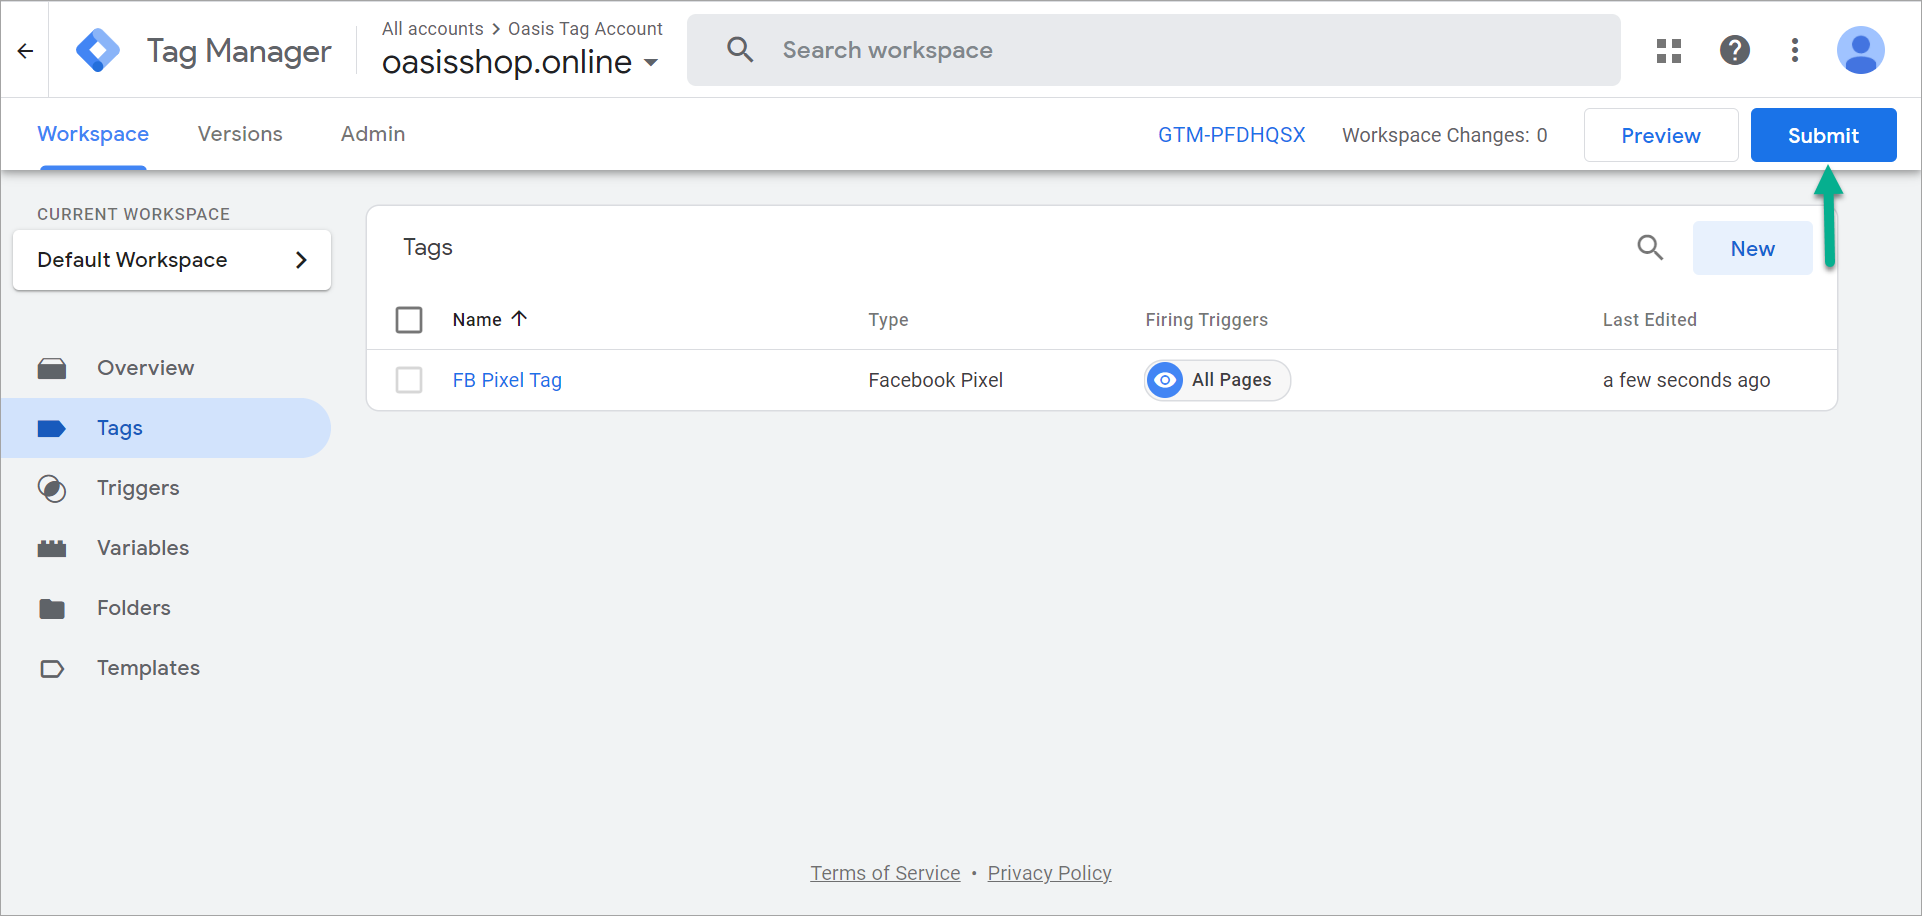
Figure 11: Submitting a Version
Give a name and description to the version, and publish it.
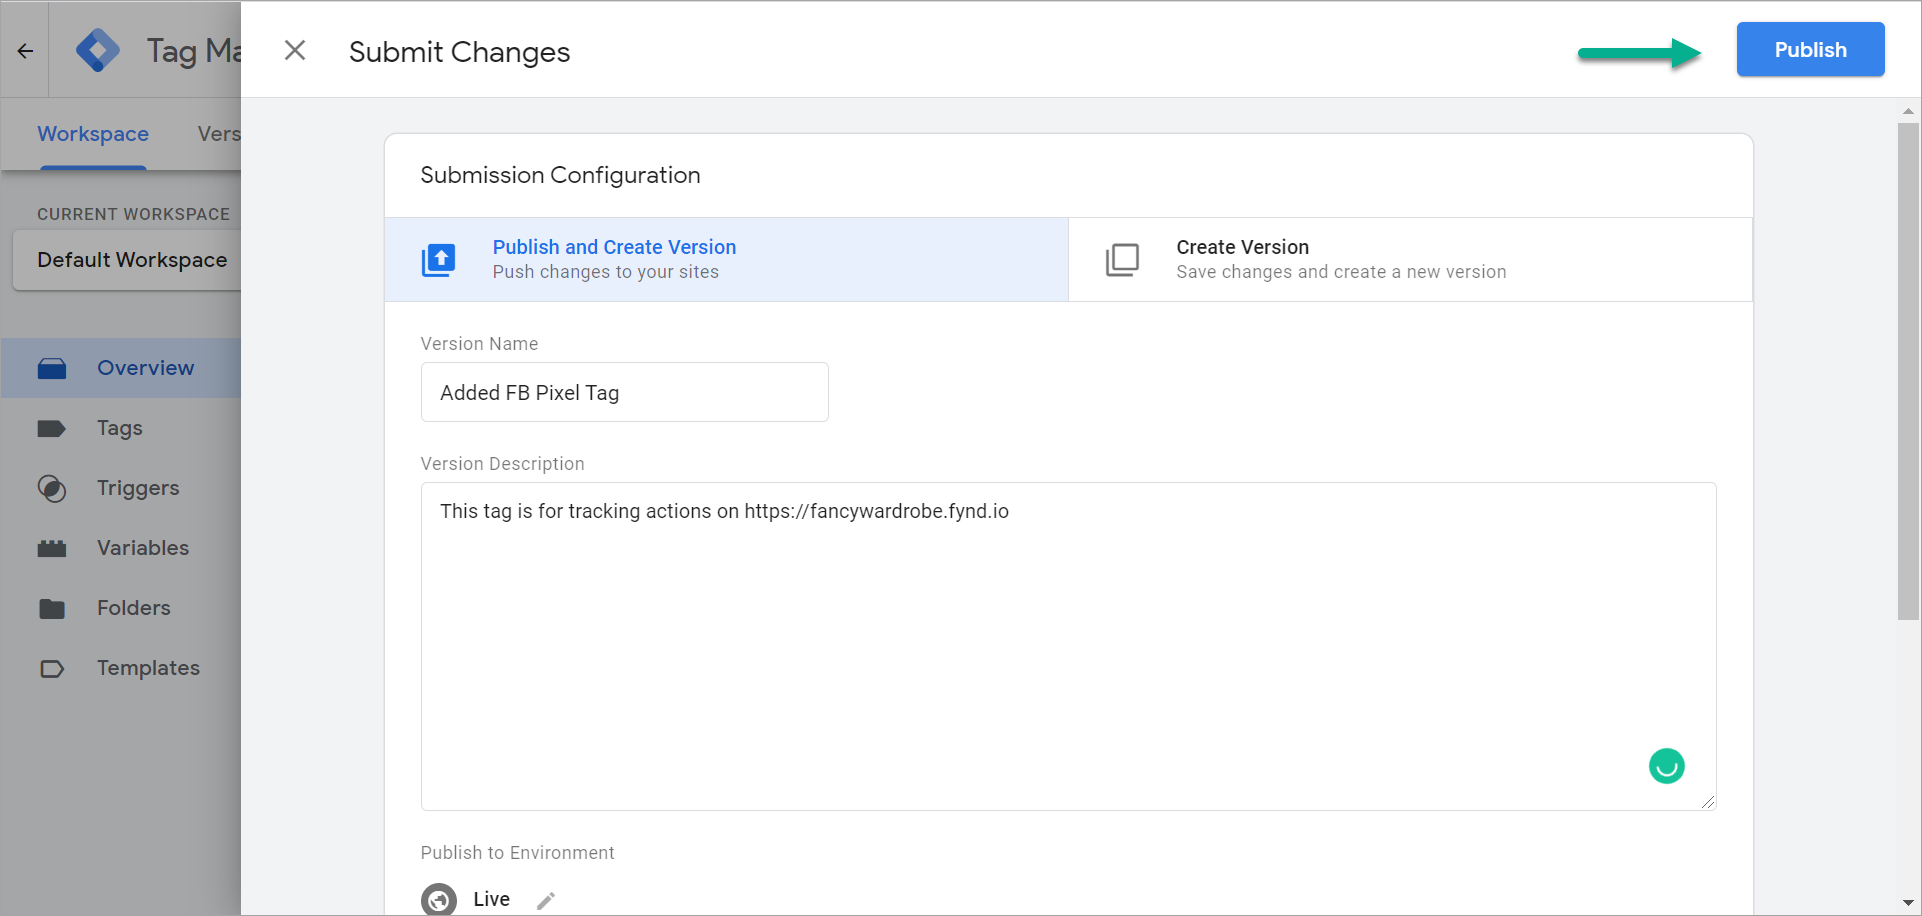
Figure 12: Publishing a Version
Adding a code for firing events
On Fynd Platform, go to the Settings page of your sales channel, and click Tags.
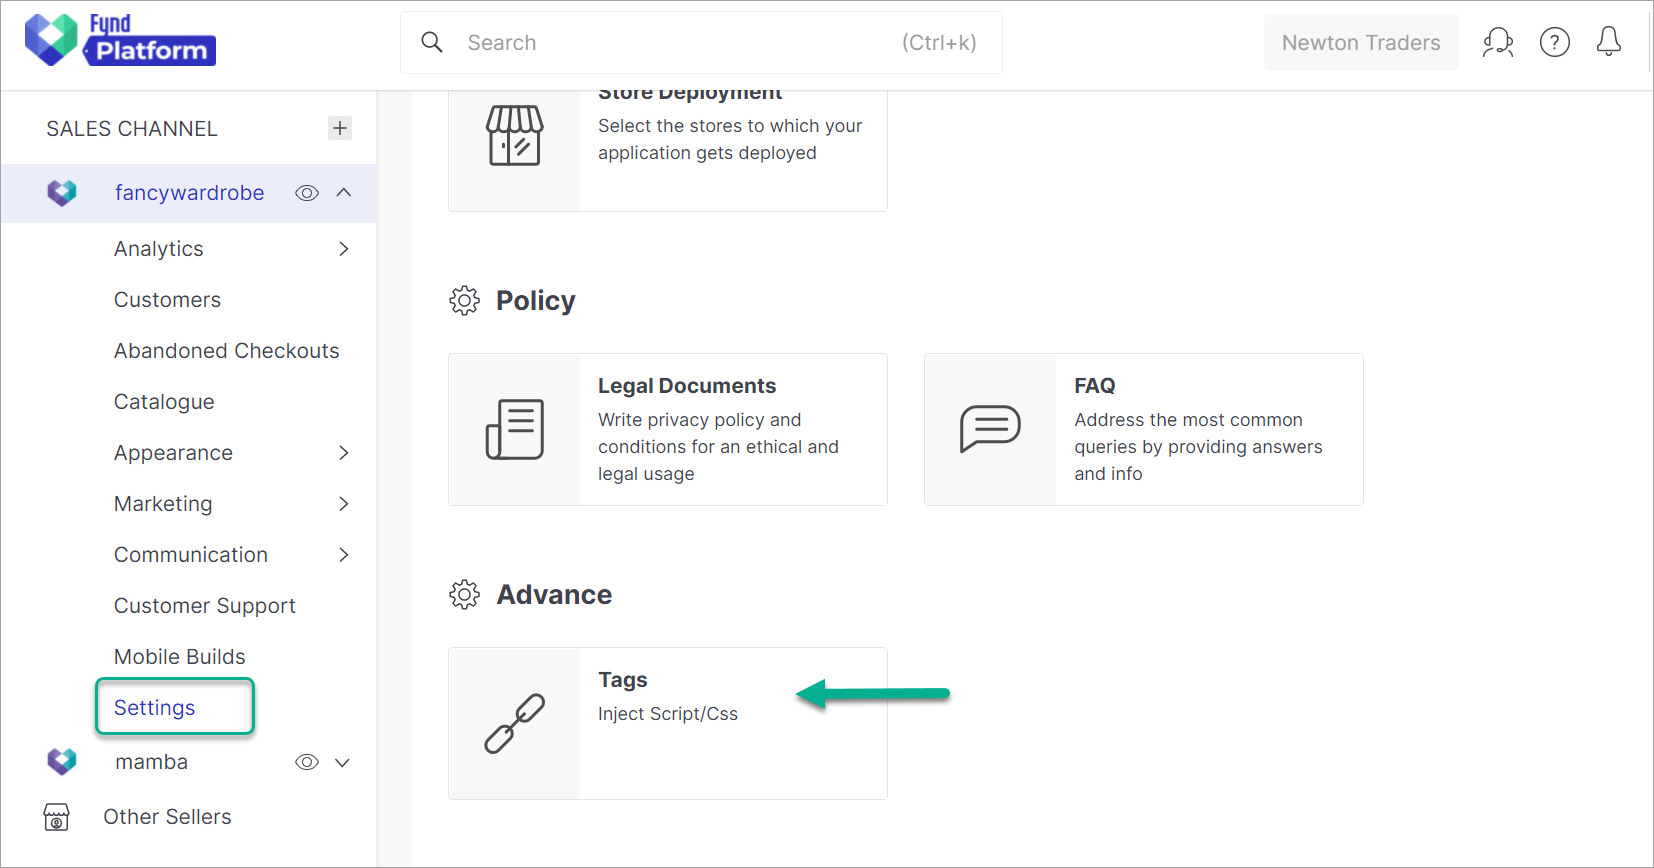
Figure 13: Fynd Platform Settings - Tags
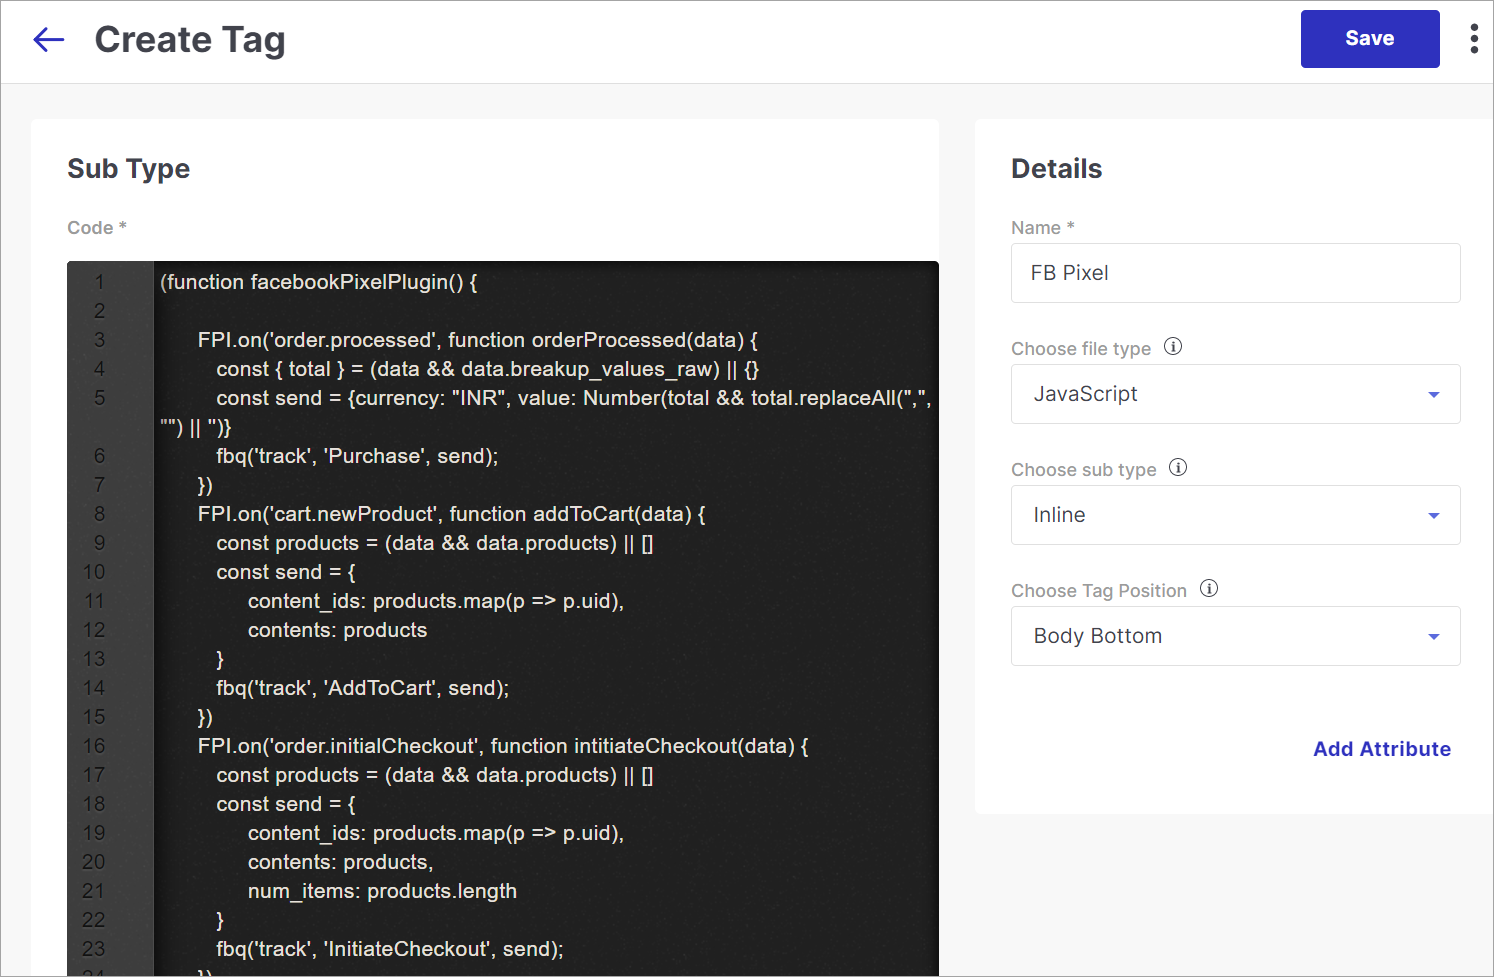
Create a tag and enter the following values in the Details section.
- Name: Facebook Pixel
- Choose file type: JavaScript
- Choose sub type: Inline
- Choose Tag Position: Body Bottom
Copy and paste the following code into the editor.
(function facebookPixelPlugin() {

    FPI.on('order.processed', function orderProcessed(data) {
        const key = "order_id_" + data.order_id;
        if (!sessionStorage.getItem(key)) {
            const { total } = (data && data.breakup_values_raw) || {}
            const send = {
                currency: "INR",
                value: Number(total),
                content_type: 'product'
            }
            sessionStorage.setItem(key, true);
            fbq('track', 'Purchase', send);
            console.log('Purchase event fired', send);
        }
    })
    FPI.on('cart.newProduct', function addToCart(data) {
        const products = (data && data.products) || []
        const product = (products.length > 0 && products[0]) || {}
        const send = {
            content_ids: products.map(p => p.item_code),
            contents: products.map(p => {
                p.id = p.item_code;
                p.quantity = p.quantity.current;
                return p;
            }),
            content_name: product.name,
            content_category: product.category.uid,
            content_type: 'product',
            value: product.price.effective,
            currency: product.price.currency_code
        }
        fbq('track', 'AddToCart', send);
        console.log(send)
    })
    FPI.on('order.initialCheckout', function intitiateCheckout(data) {
        const products = (data && data.products) || []
        const send = {
            content_ids: products.map(p => p.item_code),
            contents: products.map(p => {
                p.id = p.item_code;
                p.quantity = p.quantity.current;
                return p;
            }),
            num_items: products.length,
            currency: 'INR',
            content_type: 'product',
            value: products.reduce((sum, p) => sum + p.price.effective, 0)
        }
        fbq('track', 'InitiateCheckout', send);
        console.log(send)
    })
    FPI.on('product.view', function productView(data) {
        const product = (data && data.product) || {};
        product.id = product.item_code;
        const send = {
            content_ids: [product.item_code],
            contents: [product],
            content_name: product.name,
            content_category: product.category.uid,
            content_type: 'product',
            value: product.price.max,
            currency: product.price.currency_code,
            content_category: product.category.uid
        }
        fbq('track', 'ViewContent', send);
    })

})()
- Click Save. Pixel is successfully added to your website.
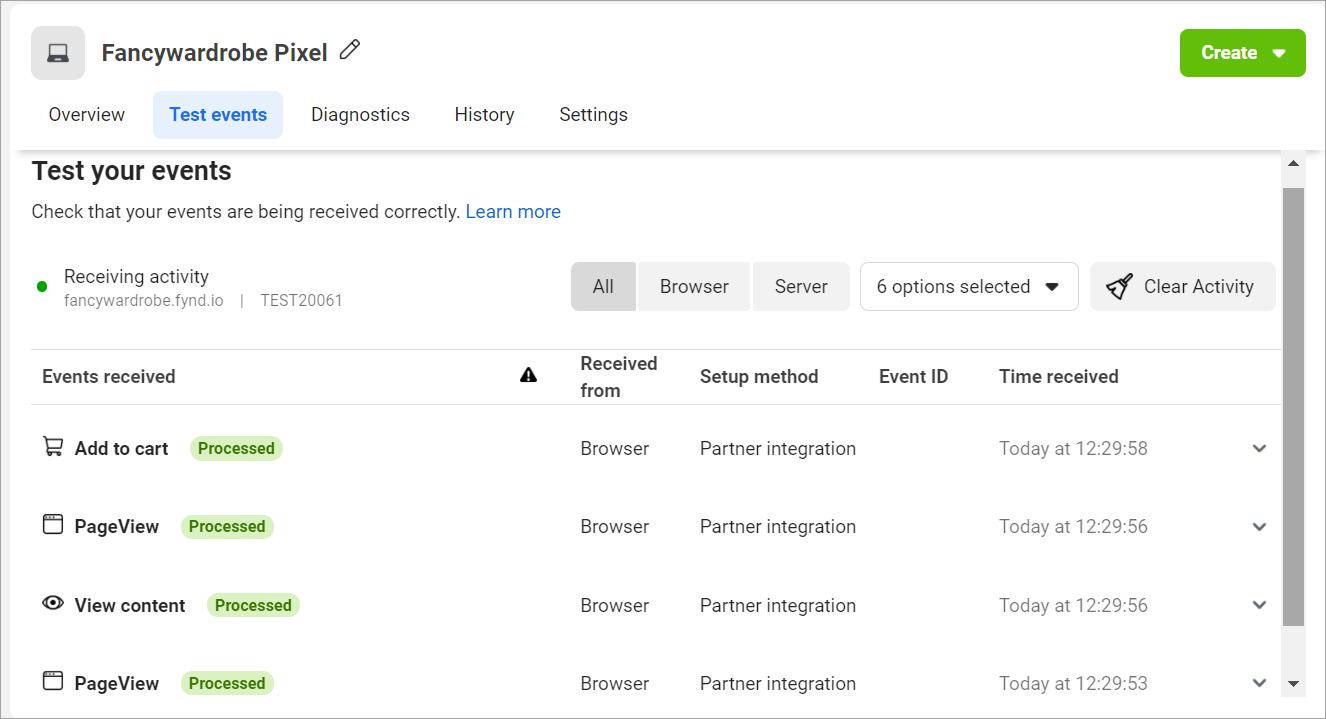
Output
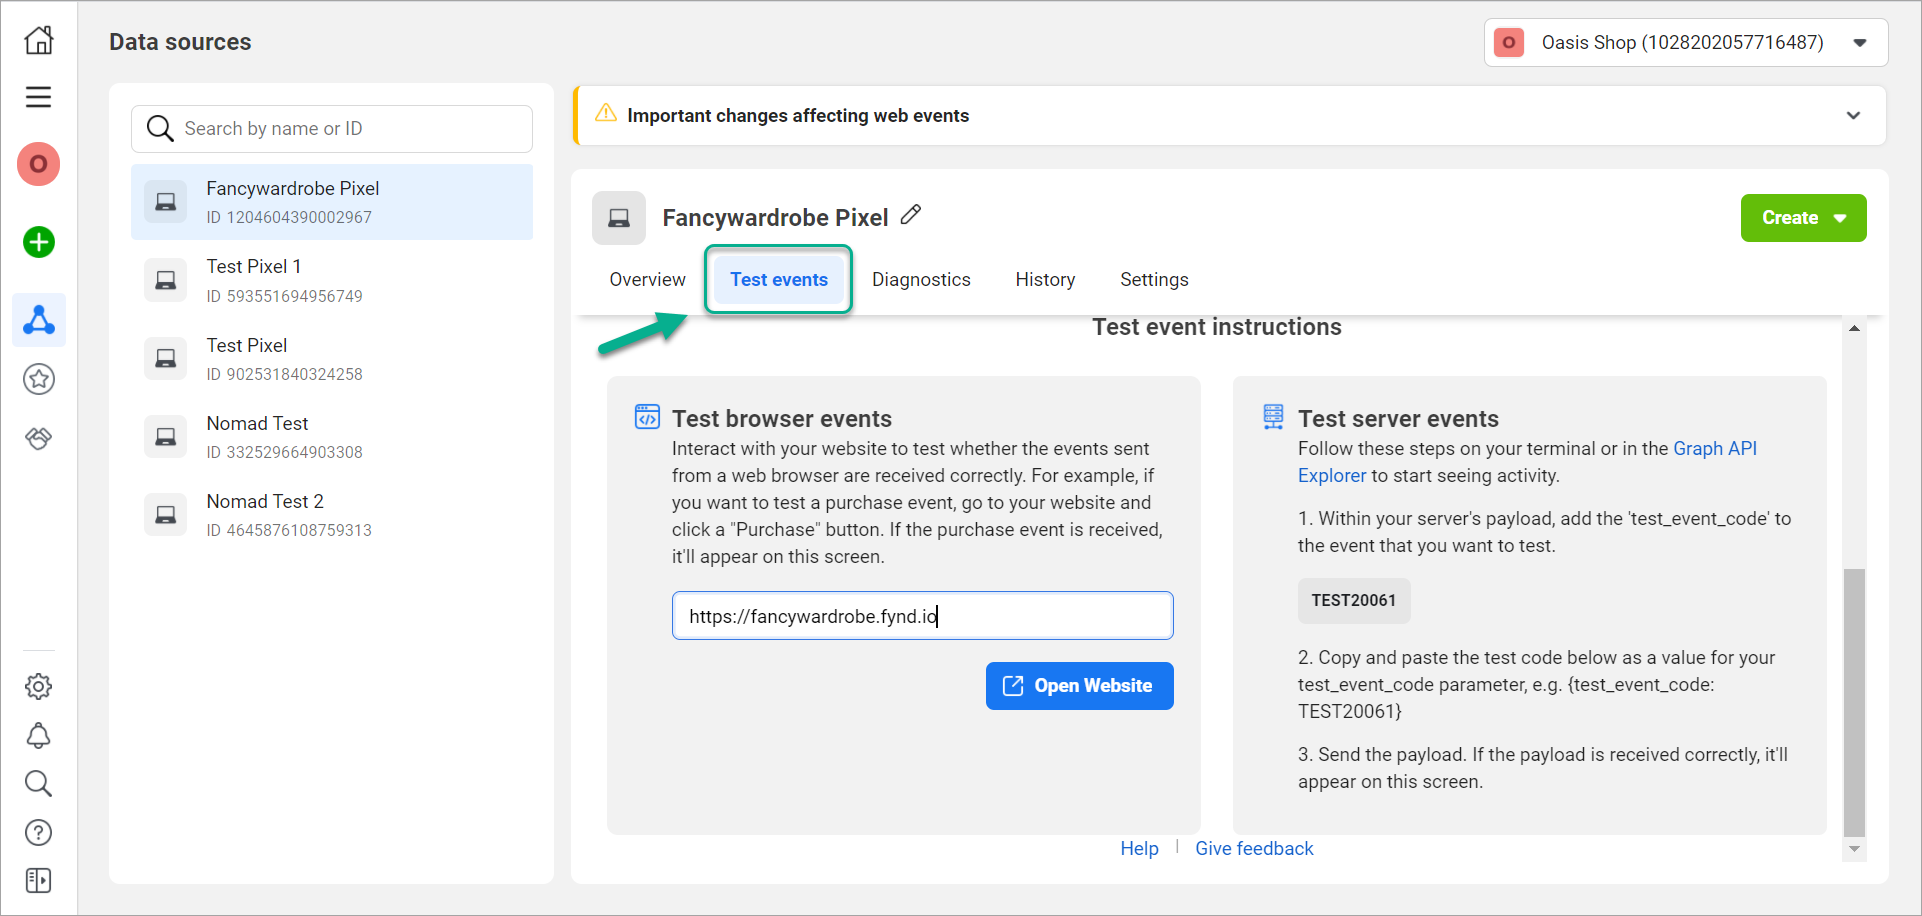
You can test Pixel in the Events Manager section of your Facebook Business account.
Go to the Test tab, enter your website URL, and click Open Website. Perform actions such as viewing a product, adding to cart, checking a product, or purchasing a product, to view the results in the Test tab.
For viewing the analytics, go to the Overview tab (it may take some time to load the activity data and graph).