Import Product
Introduction
More often than not, products are created in bulk, and so is its inventory. Describing your product and all its attribute will thereby form a catalogue. Maintaining its price and quantity will constitute an inventory.
Instead of manually taking the efforts to create your products one-by-one, you can choose to do it all together in bulk.
Steps to Import Products
Click Import.

Figure 1: Import Select Product.

Figure 2: Import Options Choose a type, department, and template from the drop-down as highlighted below.

Figure 3: Choose Product Template Here, you can download a sample file for creating products. Note that there are separate sample files for creating different types of products. Click here to know more.
- Sample Excel - An Excel file (.xlsx) for creating products.
- Sample CSV - A CSV file (.csv) for creating products.

Figure 4: Create Bulk Products
Let's assume you have downloaded an Excel file for creating a product, start filling the details of your product as shown below.

Figure 5: Sample File noteYou will get drop-down boxes for certain columns in the Excel file. Example: Brands, GTIN type, Currency, etc.
The first row highlights the headers. Hovering over any of them with your mouse pointer will show a brief description. The columns that are highlighted in green are mandatory to fill. It's recommended that you also fill the optional fields as it enhances the product description.

Figure 6: Sample File Content
Fill all the product details, similar to what we saw in the previous section. In this case, we have created 3 products.
- Case 1: Product has only one identifier (GTIN Type), e.g. EAN.

Figure 7: Excel File Example 1 Case 2: Product has more than one identifier, e.g. EAN, SKU, UPC, etc.
We have seen in the previous section that if a product has multiple identifiers, one of the identifier has to be made PRIMARY.

Figure 8: Making An Identifier As Primary In the Excel file, primary identifier is known as Seller Identifier.

Figure 9: Excel File Example 2 note- Product Dead Weight is the actual weight of the product in grams.
- If you want to add slug for each product manually, you can enter a Slug attribute at the end (preferably) of the file. Refer Adding Slug Attribute section to learn more.
Now, you are ready to upload your Excel file as shown below.

Figure 10a: Uploading Excel File 
Figure 10b: Uploading File Data
If the file is valid, you can upload your products. Click on Upload in the top-right corner. The bulk upload will initiate and it can be viewed under Upload History as shown below. The upload status will be run in a batch and it will be shown as 'Pending' till its completion.

Figure 11a: Batch Job In Progress 
Figure 11b: Batch Job Completed Successfully 
Figure 11c: Viewing Batch Details
You have successfully uploaded your products. Now, can view all your products on the All Products page.

Adding Slug Attribute
Fynd Platform allows you to manually add slug for all the products while importing a catalogue. Please refer the table below to understand the use cases while entering slug value in a file.
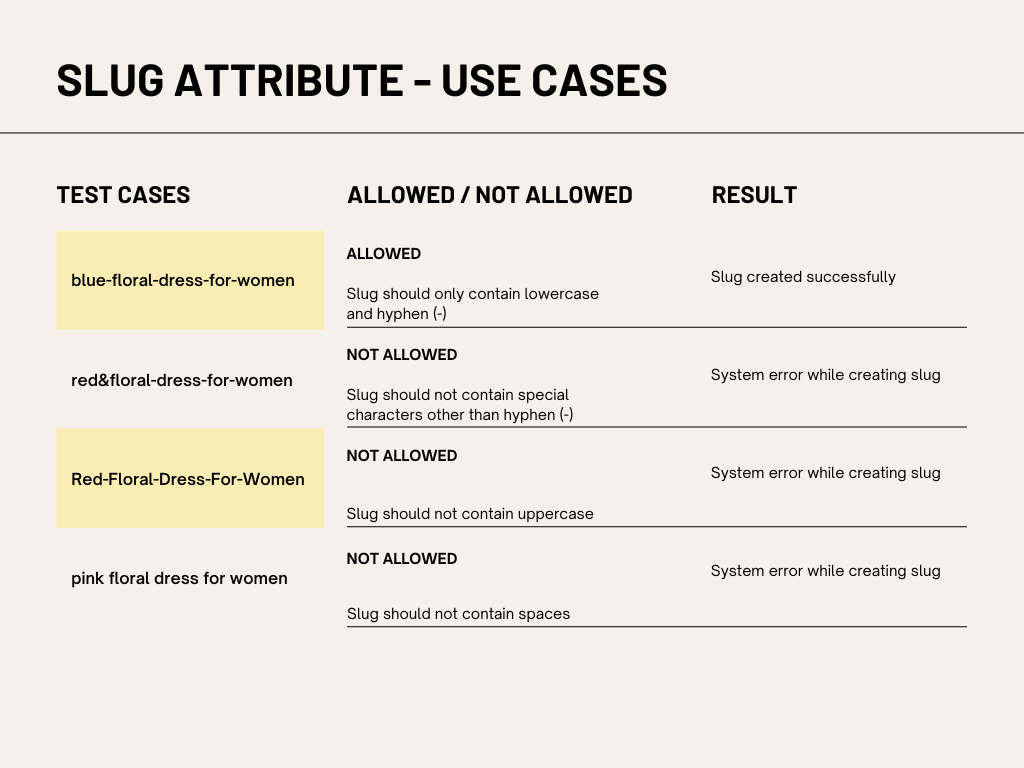
- Attribute name should be Slug, not slug or SLUG. It is a case-sensitive.
- If you add Slug column in a file then you should not keep it blank while uploading catalogue.
- Duplicate slug values are allowed. System will append product UID at the end of each slug converting it to a unique value.